Sandbox

The first step to using the app is downloading the Barcode app for your mobile device.
For iPhone/iPad Device
- Install the GEAR Inventory app from the App Store and log in with your Google account.
Android Device
- Install the GEAR Inventory app from Google Play and log in with your Google account.
Computer with a Laser Barcode Scanner
- For computers with a Laser Barcode Scanner, no installation is necessary. However, please ensure that the laser scanner is connected to your computer.
Launch the app from your web browser and set up your first form template. Then, generate a sheet in your Google Drive. Finally, install the app from Google Play or the App Store and launch it.
You can access it in a few ways: on your desktop or as an app for your mobile device.
Access from Desktop (Initial launch)
- Launch a chrome browser and enter the web app URL: https://app.getgear.io/
- The scanner must be connected to the computer.
Access from Mobile Device
- If you already have GEAR Inventory app, just launch it on your smartphone.
- If you have not installed GEAR Inventory App, go to Google Play or Apple App Sotre and install the app.
- To create a shortcut: See the guide for iPhone or Android.
Install the app through Google Workspace Marketplace
- Go to Google Workspace Marketplace and click + to install the app. Only the Google Workspace super admin can install this application. If there are multiple domains on Google Workspace, your primary domain's super admin has to install the app.
Select accessible user(s)
- After installing, the install admin enters the web app URL: https://app.getgear.io/
- To assign accessible users to the application, click on 'Manage Users'. Select the user(s) and then click on 'Save/Update' to apply changes. Only an Admin can view and access the 'Manage Users' console. To revoke user access, uncheck the box for that particular user.
- Note: Only the install admin can design a form to prompt users to fill out forms every time barcodes are scanned. For instructions on how to create a form, proceed with section 3: Setting Up Form.
Launch the GEAR application:
You can access it in a few ways: from your desktop or as an app on your mobile device.- Access from Mobile Device
- If you have the GEAR NBS 3.0 app, just launch the GEAR NBS 3.0 on your smartphone.
- If you have the GEAR NBS 2.0 app, launch a mobile browser and enter the web app URL: https://app.getgear.io/
- If you have not installed the GEAR NBS 2.0, go to Step 1 to create a shortcut: See the guide for iPhone or Android.
- Access from Desktop: Launch a Chrome browser and enter the web app URL: https://app.getgear.io/
- The scanner must be connected to the computer.
A new form screen will appear if this is your first time filling out the form. Enter the name of the form, avoiding spaces or special characters.
When you create a form, the barcode and timestamp fields are automatically set as defaults. You can add more fields by selecting the drop-down menu and clicking the [+ Add Field] button.
Add Form Fields
You can add more fields by selecting drop-down and click [+ Add Field] button. Select the field type you would like to use when designing your custom form. Make sure Field Title (renamed fields) doesn't have any special characters in it, otherwise they will cause errors with submitting.- Date: This field is for date from calendar.
- Short Answer: This field is for a short title, such as product, item.
- Paragraph: This field is for more detailed title.
- Dropdown: This field is for a dropdown list. For example, title name “Location” and add options such as “Warehouse”, “Main Office”, “Parking Lot”, “Conference Room”.
- Checkboxes: Multiple Selection Checkboxes.
- Number Count: Users can click plus or minus to adjust the current quantity. It is useful for volume of same barcode.
- Radio Button: Radio buttons can designed to select options on the form.
- GPS Coordinates: A field to record a scanned location. It will create two fields - Longitude and Latitude, and Google Maps link.
- Secondary Barcode: When a user scans the second barcode, it will register in the same row on Google Sheet.
- Hidden: A hidden field will not be displayed on the form but show on Google Sheet.
- Image: A field to upload or take a picture from mobile.
- Stock: The 'Stock' field is designed to control 'In' and 'Out' stock quantities with adjustable options. 'Current Stock' displays the total amount of available products. The 'Choose In/Out' option allows you to select either 'in' or 'out'. If you want to give 3 items as an example for this barcode item, select 'In' on Choose In/Out and enter 3 under Quantity.
- Current User: Current user's email is recorded upon form submit. It is useful if multiple Google Workspace users are using the app.
Edit Field Options
For more field edit options, click the [+] on a field on your form. This will expand your options on the specific field you have selected.- Rename: Renaming a field will update it on the Google sheet in the first row with that new name.
- Required Field: If this field is marked as required, the user must fill out that fieldtype in order to submit the form and any changes.
- Disable:Selecting 'No' disables the field temporarily. Selecting 'Yes' will disable it entirely, preventing any input from being accepted into the form.
- Delete:To delete a field, click the red delete button to remove the field type.
Preview Form
Once you click [Complete and Save] for your form, you will receive a notification that the Google Sheet has been created. Select [Preview Form] for a pop-up view of your form. Preview mode also allows viewing drop-down menus and more.Google Sheet Generation
Once you have clicked [Complete and Save] for your form, a notification that the Google Sheet has been created will be sent to you. The spreadsheet is automatically generated correlating with your text fields in the form.Edit Forms
Once you've created a form and saved it, you can edit the fields to manage data more effectively. Editing your form will also automatically update your corresponding Google Spreadsheet. You can rename existing field names, add more fields or delete unwanted ones too! Edit Form on Desktop
To make edits to your form:
① Go to https://app.getgear.io/
② Choose a form from the drop-down menu and click the [Edit Form] button.
③ Your existing form fields will appear. You can also add more form fields by choosing from the dropdown menu and clicking the [+Add Field] button. You can also click on each field to rename it or delete it.
④ Click [Complete Edit and Update]. Your Google Spreadsheet will be updated to reflect your changes.
⑤ Click [OK] to confirm your form update. Check your Google Sheet to see your updated spreadsheet.
Edit Form on Mobile
① Open your NBS app, or go to https://app.getgear.io/ on your mobile browser.
② Choose a form from a drop-down and click [Edit Form] menu button.
③ Your existing form fields will appear. You can also add more form fields by choosing from the dropdown menu and click [+Add Field]. You can also click on each field to rename it or delete it.
④ Click [Complete Edit and Update] Your Google Spreadsheet will be updated accordingly to reflect your changes.
⑤ Click [OK] to confirm your form update. Check your Google Sheet to see your updated spreadsheet.
Manage Multiple Forms
NBS PRO users can conveniently create and manage up to 10 forms. Because each form is bound to an NBS Google spreadsheet, you will be able to see up to 20 tabs in your sheet (10 asset management tabs and 10 transaction log tabs).To Add a Form
To utilize the function, begin by creating the first form and selecting the (+) icon on drop-down menu bar. You will then be able to create a new form. If you have already named your form, and wish to rename it, delete the existing form and recreate it. To Delete a Form
To delete a form, simply click the 'Edit Form' button on the main screen. Then, just click the 'Manage Form' button at the top right of the form edit screen.
Barcode Scanning
Our app is capable of capturing both 1D barcodes and 2D barcodes, making it fully compatible with GS1 Sunrise 2027 initiative. Additionally, our barcode capturing feature utilizes Machine Learning/Artificial Intelligence (ML/AI), ensuring ultrafast and precise results.- 1D Barcodes(Linear formats): Codabar, Code 39, Code 93, Code 128, EAN-8, EAN-13, ITF, UPC-A, UPC-E
- 2D Barcodes: Aztec, Data Matrix, PDF417, QR Code
If you are using a web app with a laser barcode scanner, access the GEAR web app and log in with your Google account. Then, click on the tab labeled "Click here and scan an item with USB barcode scanner". Perform a scan to display the form.
Form Input via Mobile
To fill out the required fields, users input text in various formats. Once they have finished entering their information on the form, they click on "Submit Changes". This action records the data into the app's database, which corresponds to your GEAR Google Sheet. Multiple Barcode Recognition
By using the secondary barcode function from the form's dropdown menu, users can locate multiple barcodes within a single row on the Google Sheet that tracks inventory.When the creator of a form clicks on the “Complete and Save” button, the form is automatically published, generating an NBS spreadsheet in the Google Drive of the associated Gmail account
Locating your Spreadsheet
To properly view the spreadsheet, make sure you are accessing it on the same Gmail account that was logged in to when designing the form.Rename Sheet
To rename your GEAR NBS spreadsheet, simply click on the Google Spreadsheet title and rename the sheet to fit your purposes. Sheet Tabs
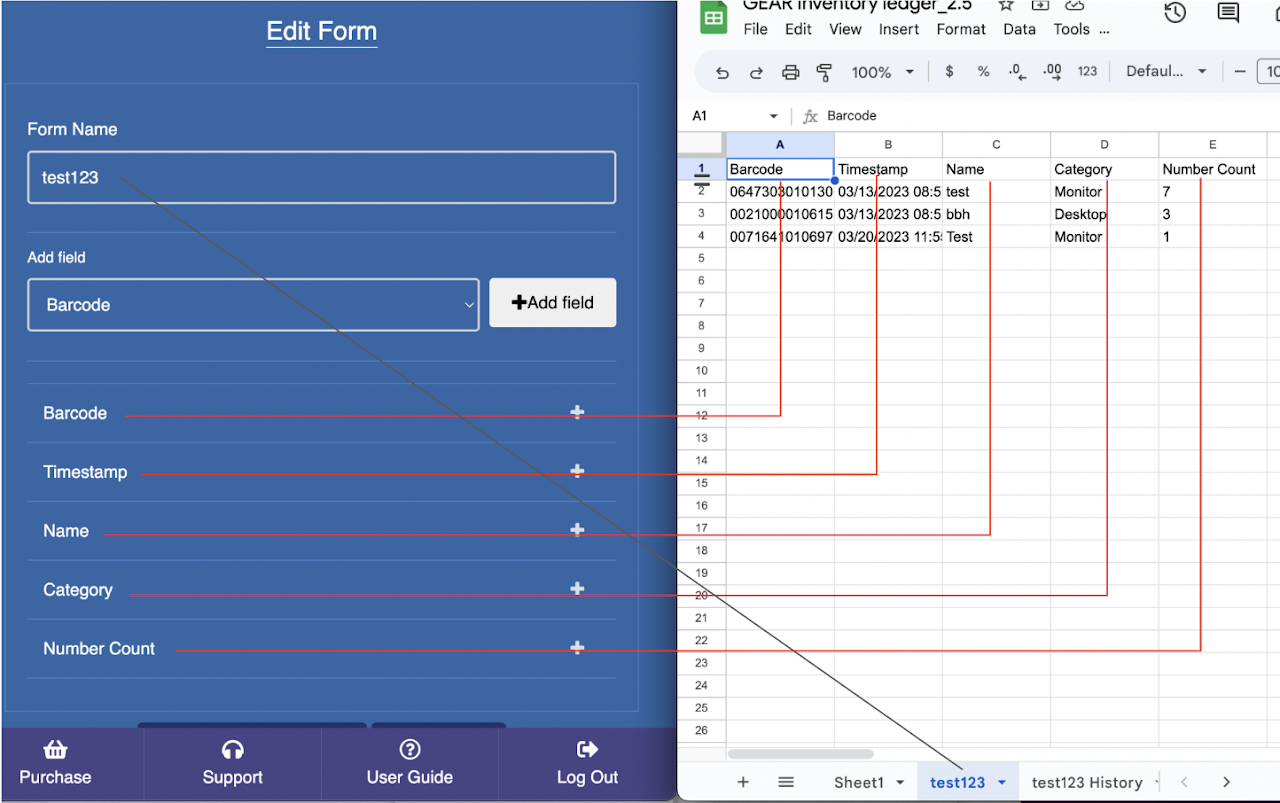
The GEAR NBS Spreadsheet has asset tabs at the bottom.- Barcode Scanner tab: [Your Form Name]
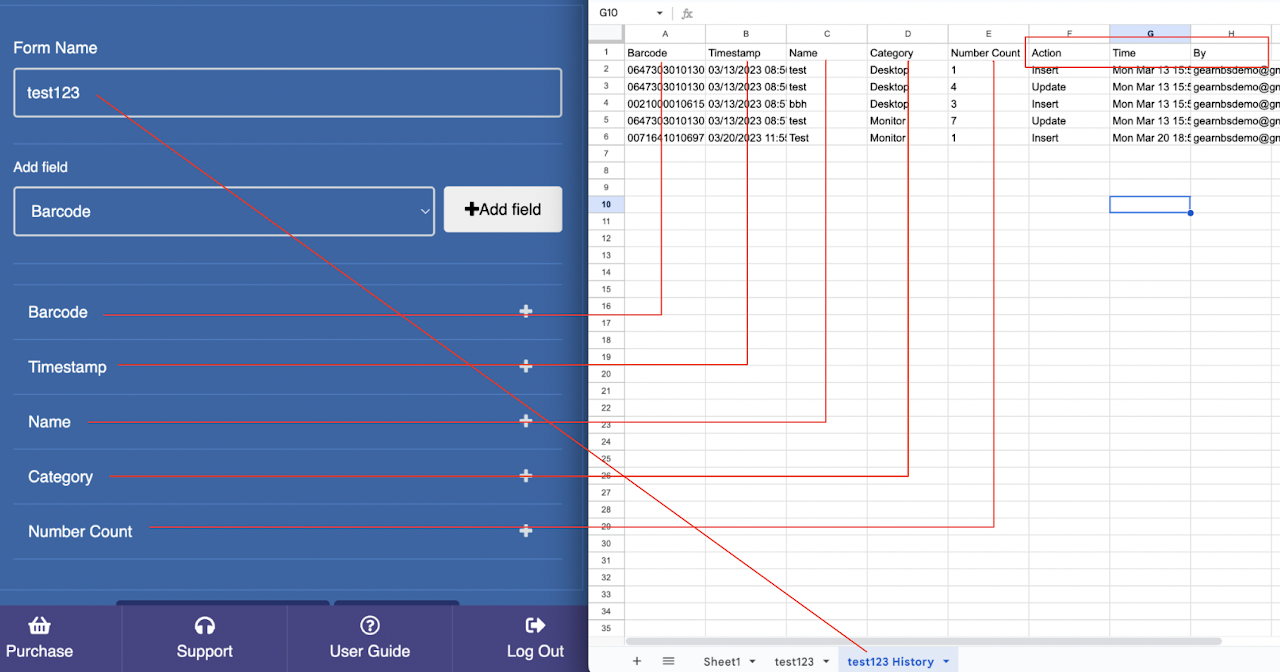
Once you open up the spreadsheet, click on the "Form Name" tab at the bottom of it to view your textfield titles. Once users start scanning items and submitting forms via mobile, information will be automatically entered into the Google Spreadsheet. - History Tab: [Your Form Name History]
With the "FORM NAME History" tab, you can see all scans histories. This tab stores the records of scanned items. On an initial scan, input a barcode number as "Insert". If the same code is rescanned, the system detects it as an existing item and updates the corresponding row. This provides much more detailed tracking than what's provided in Barcode Scanner tabs.
The most common error in NBS is a submission error: please confirm that the form name, fields, and orders match.
Form Tab